Connecting to the DN42 decentralized network
I have always been interested in how the internet works, it has marvelled me how we can communicate with people from across the globe in milliseconds, but I never really understood how it worked. But a few months ago I stumbled upon this article that explained how to build your own anycast network, and introduced me to some concepts that I had never heard of before, like BGP and ASNs.
The DN42 network is a decentralized network that uses VPNs and BGP to create an “internet” over the internet. This means that anyone who is interested on learning the technologies that ISPs use to create the internet can join and learn how it works without the need of expensive hardware or messing up with the real internet 1.
Preparation
Before you can connect to the DN42 network you need to register an Autonomous System Number (ASN), network prefixes, and routes. This process is done by creating a pull request to the DN42 registry, where you specify the ASN you want to use, the network prefixes you want to announce, and the routes you want to receive. The getting started guide on the DN42 website explains how to do this in detail.
The ASN is a unique number that identifies your network on the internet, each ISP in the real internet has one or more ASNs that they use to announce their network prefixes to the rest of the internet, and we will use it to do the same on the DN42 network.
My ASN is 4242422799 and I have the following network prefixes:
- IPv4:
172.20.196.64/27 - IPv6:
fd44:665c:b6b3::/48
I will be using these prefixes to announce my network to the rest of the DN42 network, and I will be receiving the routes of the other members of the network to be able to communicate with them.
Requirements
Software
We need the following software to connect to DN42:
- A VPN client (I will be using WireGuard)
- A BGP daemon (I will be using BIRD)
- Something to manage routes (I will be using IPTables)
There are other alternatives to the software I will be using, like OpenVPN for the VPN client or Quagga for the BGP daemon, but I chose these because they are the ones that I found the easiest to use and the ones that most people in the DN42 community use.
Hardware
For the hardware requirements, you need a router that supports the software you will be using, or any computer that can act as a router. I chose to use a small VPS from IONOS with 1 vCPU, 1GB of RAM, and 10GB of storage, but you can use any computer that you have lying around.
Configuration
Creating your WireGuard keys
To peer with other members you need to create a tunnel with them, and to do that you need to create a pair of public and private keys needed to authenticate the connection. You can do this by running the following commands:
# Generate the private key
$ wg genkey > privatekey
# Generate the public key
$ wg pubkey < privatekey > publickey
We will need the public key for the following steps, so keep it handy.
Choosing a peer
The first thing you need to do in order to connect to the DN42 network is to find a peer that is willing to peer with you. You can use a tool like PingFinder to find peers that are close to you geographically, or you can ask in the DN42 IRC channel for someone to peer with you.
Other networks like Kioubit have an automated peering system that allows you to peer with other members of the network, by filling some information about your network in their website. You can find a list of systems with automated peering here.
I chose to peer with Kioubit specifically because of their automated peering system and because it is one of the biggest networks in the DN42 community. Once you authenticate to the Kioubit website and choose a node to peer with, we need to fill in the information about our network in the form.
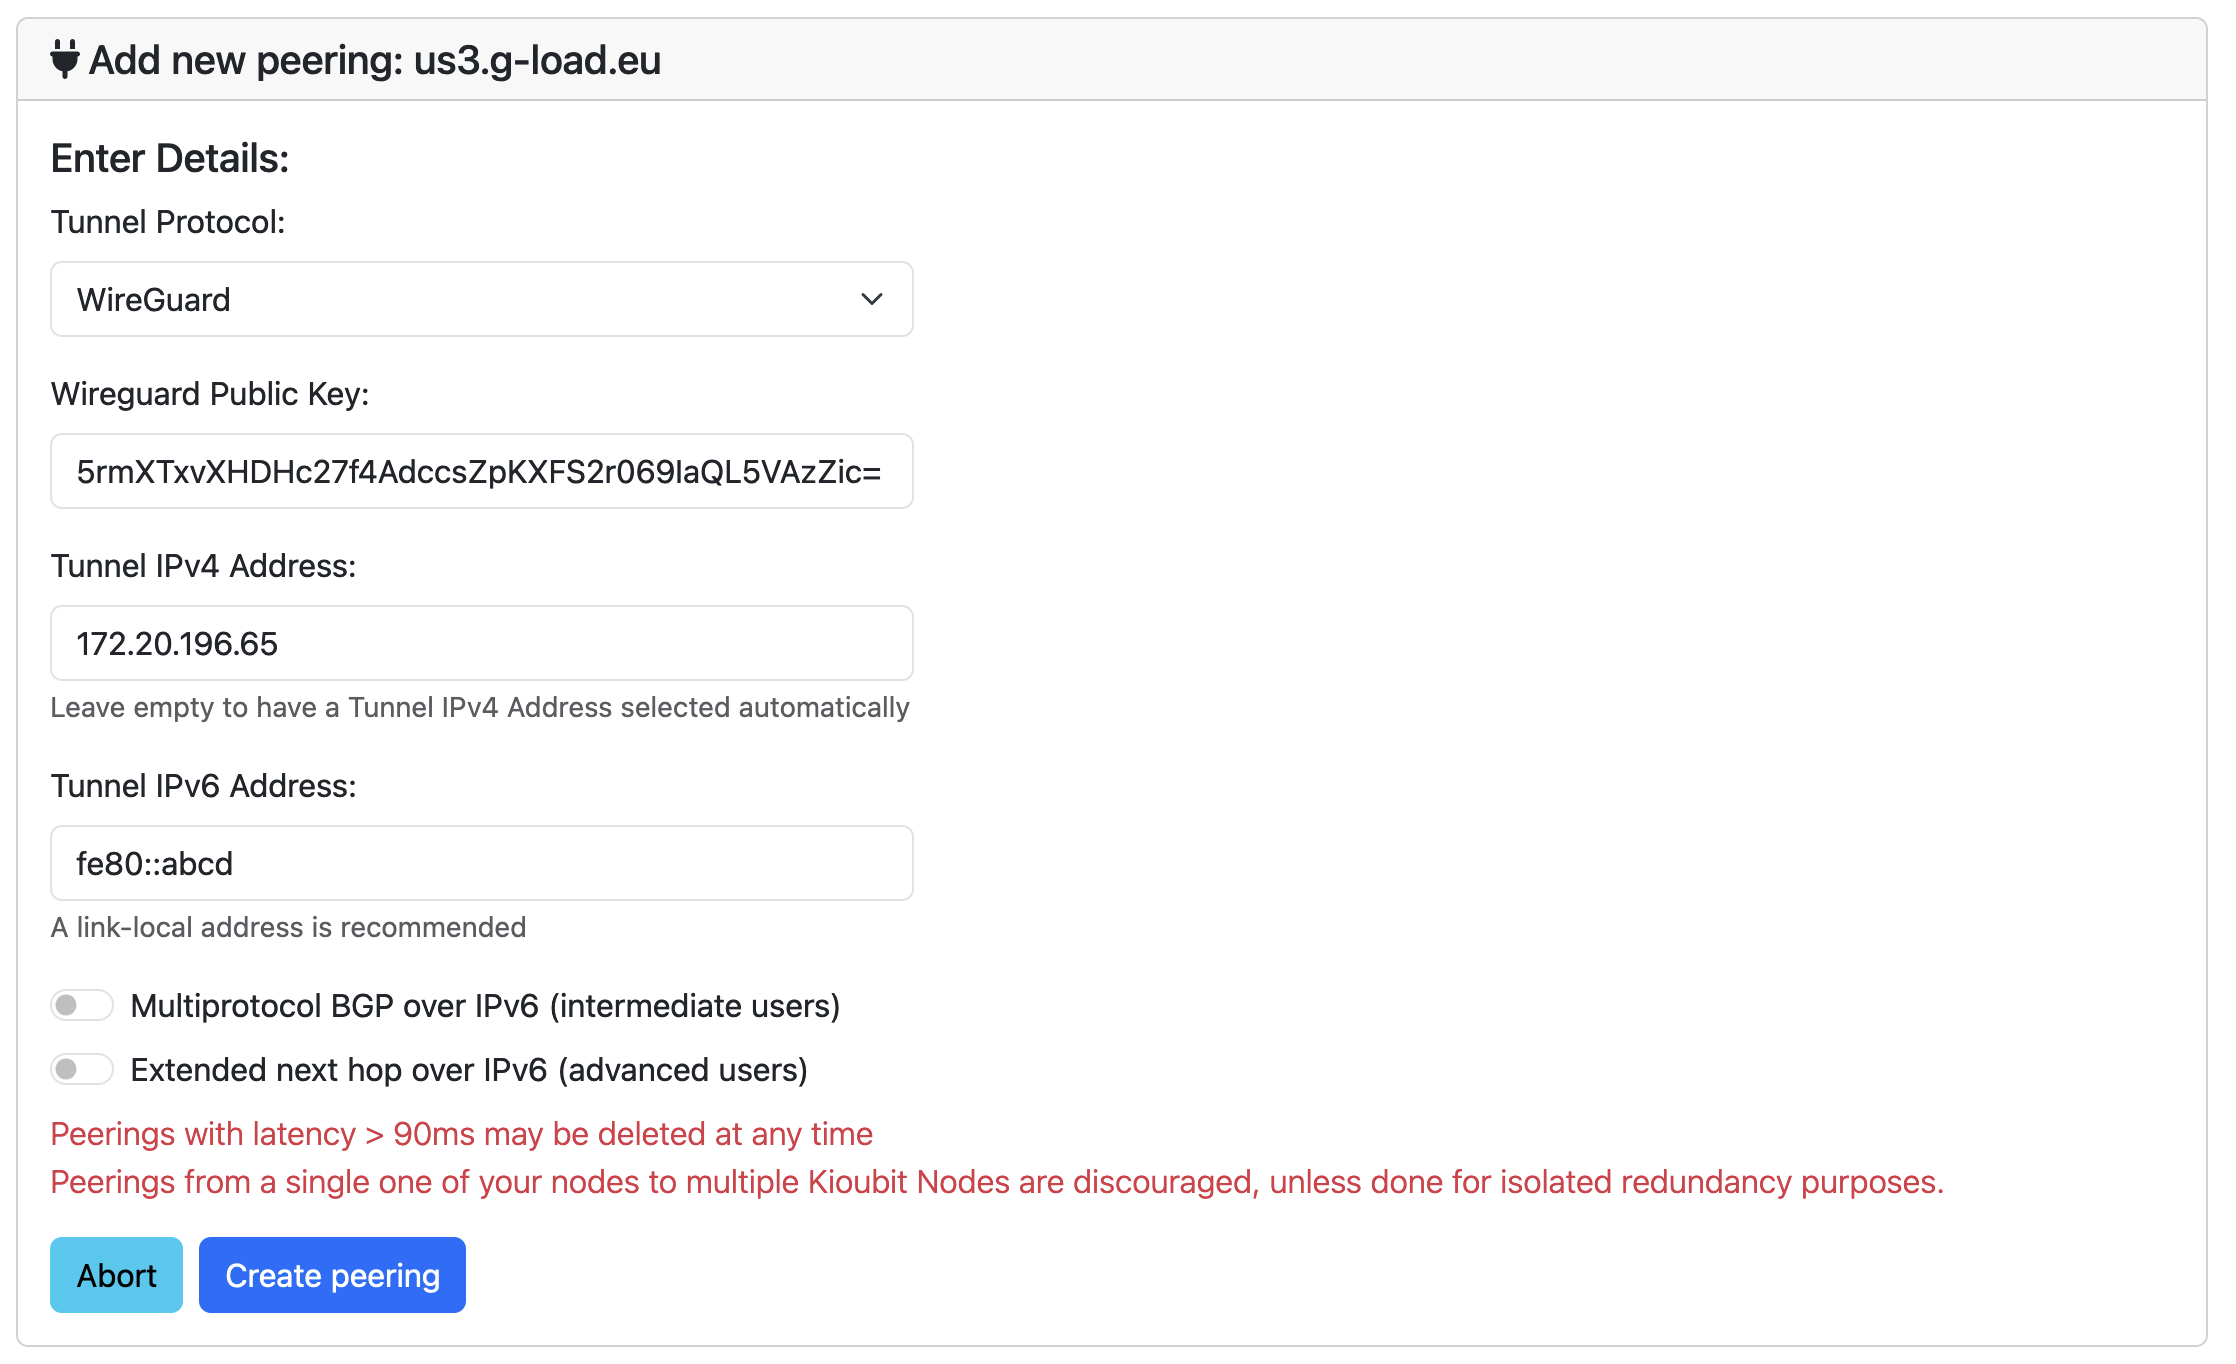
First we need to fill our WireGuard public key that we generated previously. Then, for the Tunnel IPv4 address we will use the first non-zero IP address of our network prefix, in my case 172.20.196.65. And finally, for the Tunnel IPv6 address we will generate a link-local address 2 using the fe80::/10 prefix, in my case fe80::fe80::abcd.
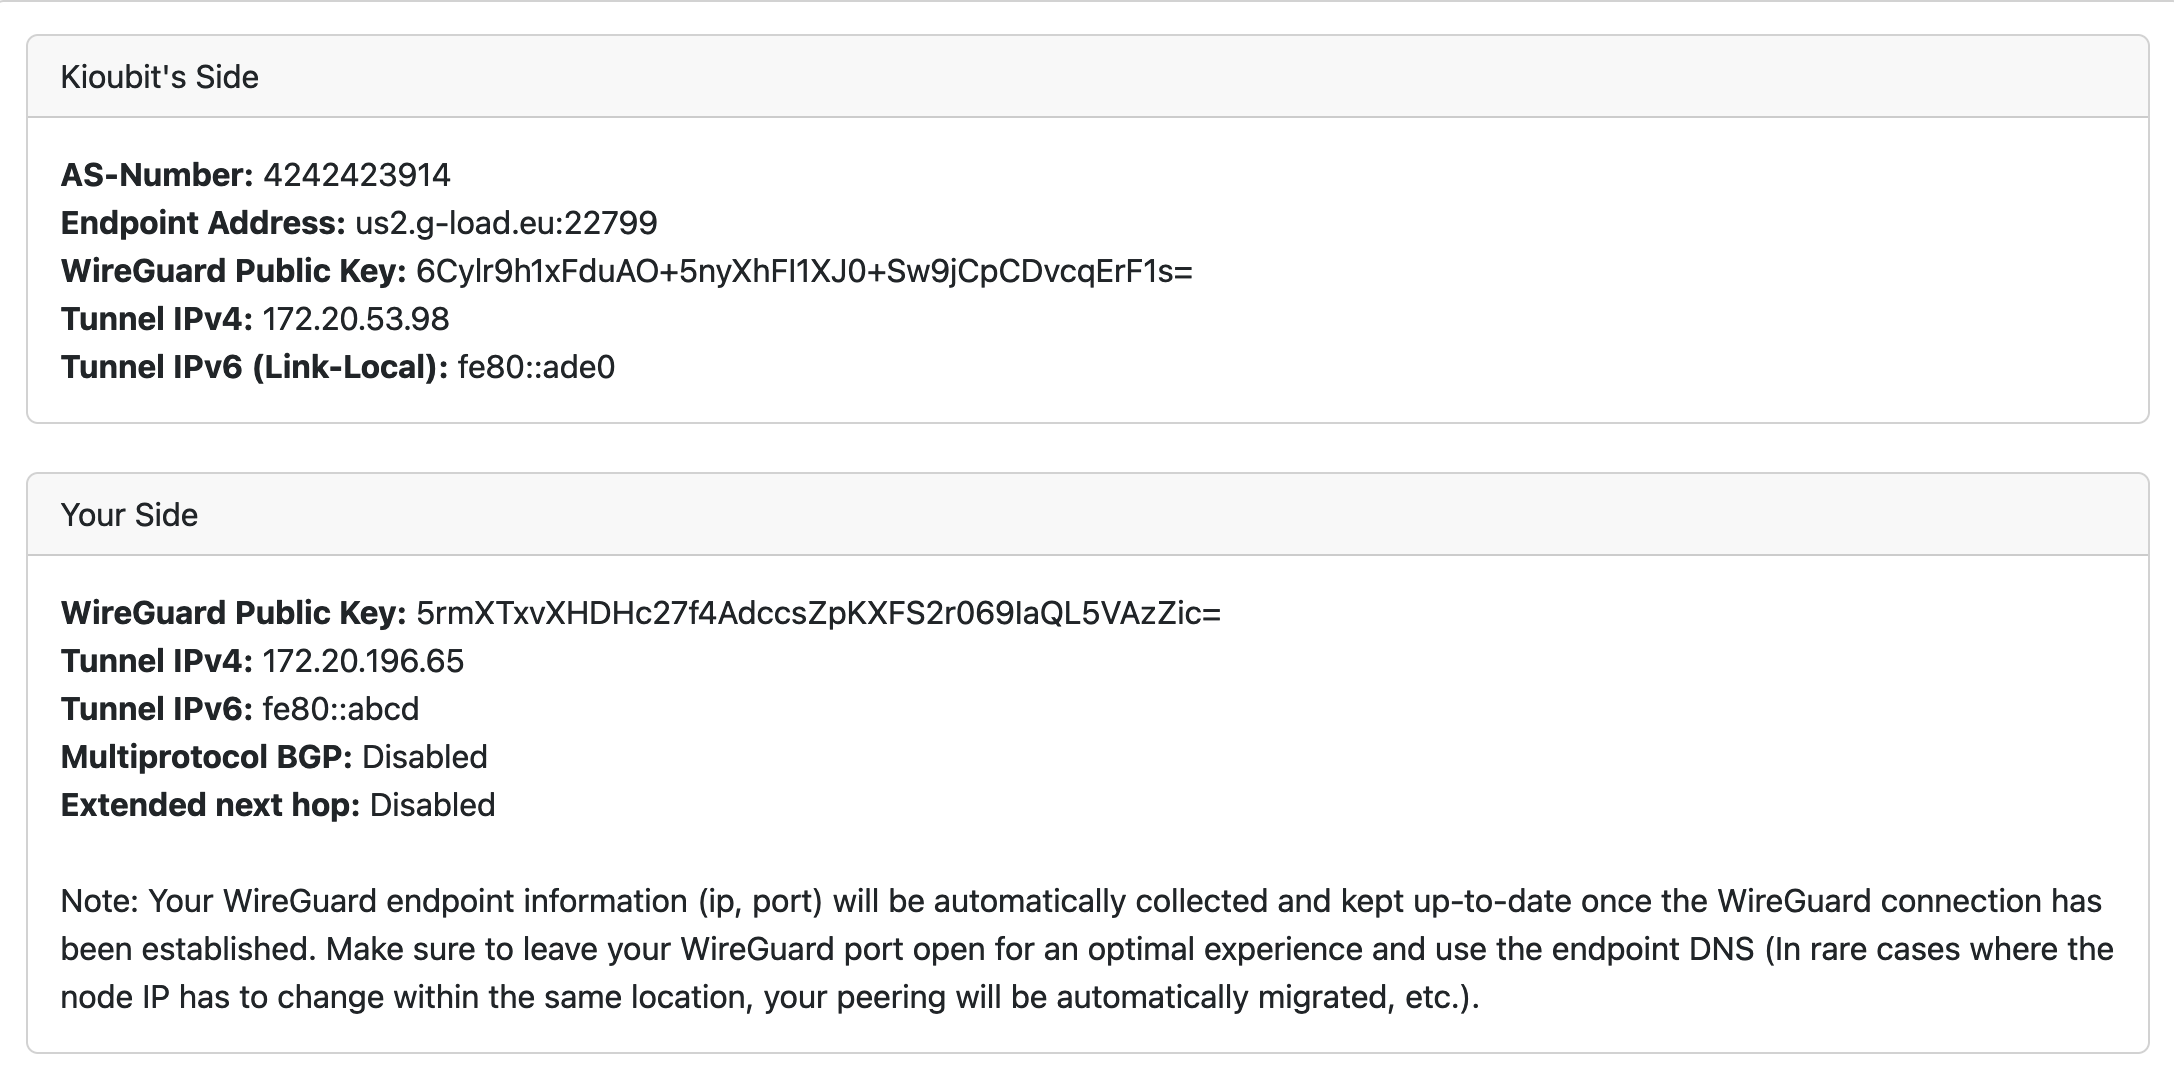
Once we fill in the information and submit the form, the information we need to connect to the Kioubit node will be displayed on the screen.
Creating the WireGuard tunnel
Now that we have the information we need to connect to the Kioubit node, we can create the WireGuard tunnel. We will create a configuration file with the information we got from the Kioubit website and add it to the WireGuard interface.
# /etc/wireguard/kioubit.conf
[Interface]
PrivateKey = <YOUR PRIVATE KEY>

[Peer]
PublicKey = 6Cylr9h1xFduAO+5nyXhFI1XJ0+Sw9jCpCDvcqErF1s=
Endpoint = us2.g-load.eu:22799
AllowedIPs = 0.0.0.0/0,::/0
With the configuration file created, we can add it to the WireGuard interface and enable it.
# Create the WireGuard interface
$ ip link add dev "kioubit" type wireguard
# Add the configuration file to the interface
$ wg setconf "kioubit" /etc/wireguard/kioubit.conf
# Add our link-local IPv6 address to the interface
$ ip addr add fe80::abcd/64 dev "kioubit"
# Peer with the Kioubit node
# The first IP is our IP and the second IP is the Kioubit node IP
$ ip addr add 172.20.196.65/32 peer 172.20.53.98/32 dev "kioubit"
# Enable the interface
$ ip link set "kioubit" up
Configuring BIRD
Now that we have the WireGuard tunnel up and running, we need to configure BIRD to announce our network prefixes to the rest of the DN42 network and to receive the routes of the other members.
First, we need to create the configuration file for bird.
# /etc/bird.conf

################################################
#               Variable header                #
################################################

define OWNAS =  4242422799; # Your ASN
define OWNIP =  172.20.196.65; # The first IP of your IPv4 prefix
define OWNIPv6 = fd44:665c:b6b3::1; # The first IP of your IPv6 prefix
define OWNNET = 172.20.196.64/27; # Your IPv4 prefix
define OWNNETv6 = fd44:665c:b6b3::/48; # Your IPv6 prefix
define OWNNETSET = [172.20.196.64/27+];
define OWNNETSETv6 = [fd44:665c:b6b3::/48+];

################################################
#                 Header end                   #
################################################

router id OWNIP;

protocol device {
    scan time 10;
}

/*
 *  Utility functions
 */

function is_self_net() {
  return net ~ OWNNETSET;
}

function is_self_net_v6() {
  return net ~ OWNNETSETv6;
}

function is_valid_network() {
  return net ~ [
    172.20.0.0/14{21,29}, # dn42
    172.20.0.0/24{28,32}, # dn42 Anycast
    172.21.0.0/24{28,32}, # dn42 Anycast
    172.22.0.0/24{28,32}, # dn42 Anycast
    172.23.0.0/24{28,32}, # dn42 Anycast
    172.31.0.0/16+,       # ChaosVPN
    10.100.0.0/14+,       # ChaosVPN
    10.127.0.0/16{16,32}, # neonetwork
    10.0.0.0/8{15,24}     # Freifunk.net
  ];
}

roa4 table dn42_roa;
roa6 table dn42_roa_v6;

protocol static {
    roa4 { table dn42_roa; };
    include "/etc/bird/roa_dn42.conf";
};

protocol static {
    roa6 { table dn42_roa_v6; };
    include "/etc/bird/roa_dn42_v6.conf";
};

function is_valid_network_v6() {
  return net ~ [
    fd00::/8{44,64} # ULA address space as per RFC 4193
  ];
}

protocol kernel {
    scan time 20;

    ipv6 {
        import none;
        export filter {
            if source = RTS_STATIC then reject;
            krt_prefsrc = OWNIPv6;
            accept;
        };
    };
};

protocol kernel {
    scan time 20;

    ipv4 {
        import none;
        export filter {
            if source = RTS_STATIC then reject;
            krt_prefsrc = OWNIP;
            accept;
        };
    };
}

protocol static {
    route OWNNET reject;

    ipv4 {
        import all;
        export none;
    };
}

protocol static {
    route OWNNETv6 reject;

    ipv6 {
        import all;
        export none;
    };
}

template bgp dnpeers {
    local as OWNAS;
    path metric 1;

    ipv4 {
        import filter {
          if is_valid_network() && !is_self_net() then {
            if (roa_check(dn42_roa, net, bgp_path.last) != ROA_VALID) then {
              # Reject when unknown or invalid according to ROA
              print "[dn42] ROA check failed for ", net, " ASN ", bgp_path.last;
              reject;
            } else accept;
          } else reject;
        };

        export filter { if is_valid_network() && source ~ [RTS_STATIC, RTS_BGP] then accept; else reject; };
        import limit 9000 action block;
    };

    ipv6 {
        import filter {
          if is_valid_network_v6() && !is_self_net_v6() then {
            if (roa_check(dn42_roa_v6, net, bgp_path.last) != ROA_VALID) then {
              # Reject when unknown or invalid according to ROA
              print "[dn42] ROA check failed for ", net, " ASN ", bgp_path.last;
              reject;
            } else accept;
          } else reject;
        };
        export filter { if is_valid_network_v6() && source ~ [RTS_STATIC, RTS_BGP] then accept; else reject; };
        import limit 9000 action block;
    };
}


include "/etc/bird/peers/*";
Next, we need to download the ROA files that will be used to validate the routes we receive from the other members of the DN42 network.
$ wget https://dn42.burble.com/roa/dn42_roa_bird2_4.conf -O /etc/bird/roa_dn42.conf
$ wget https://dn42.burble.com/roa/dn42_roa_bird2_6.conf -O /etc/bird/roa_dn42_v6.conf
Finally, we need to create the configuration file for the Kioubit peer.
# /etc/bird/peers/kioubit.conf
protocol bgp kioubit from dnpeers {
    # The IP address of the Kioubit node
    neighbor 172.20.53.98 as 4242423914 ;
}

protocol bgp kioubit_v6 from dnpeers {
    # Link-local address of the Kioubit node
    neighbor fe80::ade0%kioubit as kioubit;
}
With the configuration files created, we can start the BIRD daemon.
$ systemctl start bird
Configuring forwarding
To be able to route the traffic between the WireGuard interface and the rest of the network, we need to enable IP forwarding in the kernel.
$ sysctl -w net.ipv4.ip_forward=1
Testing
Now that we have everything set up, we can test the connection by pinging the Kioubit node.
$ ping 172.20.53.98
PING 172.20.53.98 (172.20.53.98) 56(84) bytes of data.
64 bytes from 172.20.53.98: icmp_seq=1 ttl=64 time=3.07 ms
64 bytes from 172.20.53.98: icmp_seq=2 ttl=64 time=3.05 ms
64 bytes from 172.20.53.98: icmp_seq=3 ttl=64 time=3.17 ms
64 bytes from 172.20.53.98: icmp_seq=4 ttl=64 time=3.07 ms
64 bytes from 172.20.53.98: icmp_seq=5 ttl=64 time=3.18 ms
^C
--- 172.20.53.98 ping statistics ---
5 packets transmitted, 5 received, 0% packet loss, time 4005ms
rtt min/avg/max/mdev = 3.048/3.108/3.182/0.055 ms
We can also try resolving a domain name using the DNS anycast service
$ dig @172.20.0.53 burble.dn42
; <<>> DiG 9.16.23-RH <<>> @172.20.0.53 burble.dn42
; (1 server found)
;; global options: +cmd
;; Got answer:
;; ->>HEADER<<- opcode: QUERY, status: NOERROR, id: 56811
;; flags: qr rd ra ad; QUERY: 1, ANSWER: 1, AUTHORITY: 0, ADDITIONAL: 1

;; OPT PSEUDOSECTION:
; EDNS: version: 0, flags:; udp: 512
;; QUESTION SECTION:
;burble.dn42.			IN	A

;; ANSWER SECTION:
burble.dn42.		3600	IN	A	172.20.129.3

;; Query time: 27 msec
;; SERVER: 172.20.0.53#53(172.20.0.53)
;; WHEN: Sun Aug 11 11:32:55 UTC 2024
;; MSG SIZE  rcvd: 56
Conclusion
Connecting to the DN42 network was a great learning experience for me, I learned a lot about the technologies that make the internet work. I would recommend anyone who is interested in networking to join the DN42 network and learn how the internet works from the inside.
There is still a lot to learn and explore in the DN42 network, like setting up a DNS server, a web server, or even a mail server. I will be exploring these topics in future posts, so stay tuned!